
Transmission Cross Members
If you swap an engine or transmission into your Land Cruiser, you will most likely end up having to fabricate some sort of transmission crossmember to hold up the transmission and transfer case. This is one of the most common areas where we find problems in Cruisers with conversions that weren’t done by experienced shops. I think part of the problem is that nobody really offers a good DIY option for this crucial part of most conversions. There is a reason for this. There are usually too many variables going on where the crossmember needs to go for a “one size fits most” part. Engine placement, front driveshaft, exhaust routing, frame width, fuel and brake lines, and more all make it so that each crossmember would need to be a little bit different. So…most have to be custom made, and that doesn’t always turn out so well.
We’ve built hundreds of cross members over the years, and we’ve refined a couple of ways that we like to make them that work well. I’m sure that there are other good ways, but I like what we do so I’ll share it. But first, I’ll identify the most common cross member error…not isolating the transmission properly. Most OEMs use a single rubber or polyurethane mount, or isolator, in the middle of the transmission crossmember. There is a reason for this. Frame flex, and engine movement necessitate that transmissions need the ability to move independently of the frame. I realize that on most FJ40s (early through 1979) didn’t do this, but there were two reasons Toyota got away with it. One was that the engine and transmission mounts were relatively close together longitudinally down the frame, and two was that the engine block (where the engine mounts are) and the bell housing (where the transmission mounts are) is basically one big mass of heavy iron, and it can take the stress of being “tweaked” a little when the frame twists.
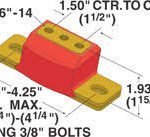
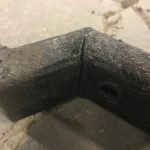
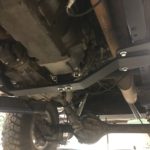
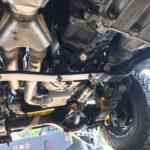
When people try to copy this design (using small rubber “donut” type isolators on the outside ends of the crossmember) with a longer transmission, especially an aluminum one or even just one with an aluminum adapter, the design won’t work. The transmission will try to rock on the pivot that a solid crossmember creates, and most likely, that will lead to failure. Notice in the picture below, that both the cross member and the adapter failed because of this design, and there were near catastrophic consequences. The solution to this problem is easy and inexpensive. There are several companies that make aftermarket transmission isolators that make transmission crossmember building easy. Search “universal transmission mount” on the internet to find very helpful pictures like this.
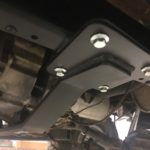
There are a couple of other tips that make building a cross member easy. You will notice in the picture below that the cross member material we used is actually just a solid bar stock, On all but our most custom signature builds, we use 1/2 X 3 or in some cases 5/8 X 2 solid bar stock for the tranny cross members. It’s durable, inexpensive, and easy to work with. Usually our techs make a simple template out of wire, and just copy it with the bar stock. We form our steel with an iron worker, but it’s easy to set up any press to bend flat stock, and a good ole’ vise and torch work plenty well too. You will also notice the simple cross member mounting plates we use. We took a hint from the Toyota design book for this one. We just make 2 matching pairs of plates and bolt them together. The top two weld to the frame and the bottom two weld to the cross member. It’s simple and sanitary.
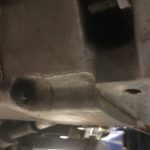
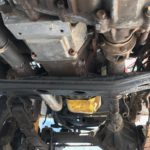
In this last picture, the builder tried to solve all of the above issues his way. He simply didn’t use any isolator at all! Just bolted up the factory crossmember and let it ride! It’s a good thing things didn’t go drastically wrong for the recent buyer of this Land Cruiser before he dropped by the shop.
Thanks for reading this blog; keep posted for more. And…if you are the builder behind either of these fails, call us next time, we’ll be glad to help out.
Great information. Thank you!
Thank you. Our long term plan is to have a library of searchable Tips & Tricks but this will take some time!
Thank you for the post! Due to some serious down time expected in the next 3-4 weeks we’re about to dive in on our project. We are converting a 1984 FJ60 to Cummins R2.8 with H55f and stock t-case.
2 Quick questions:
1. What thickness steel do you use for the pairs of plates on each side of the crossmember to attach it to the frame?
2. For this application, would 1/2 x 3″ bar stock be sufficient?
Thank you for any insight!
TC
Hi, Thanks for reaching out to us. For the crossmember mounting plates we use 3/16 plate. Normally we use 1/2” X 4 for the crossmember, but 3” will suffice. Thanks and good luck with your “Covid Cummins Conversion”
Thanks for this, very elegant design. Has the 1/2″ x 4″ been tested against a Toyota v8 and dual cases? And what do you think about axle u-bolts? I was thinking the nuts lock in and would be easy to fish over the frame on a body on project like ny 55.
Comments are closed.