Buyers Beware
Can you tell if a restored or custom-built vehicle is a quality one by looking at pictures of it on the internet? The ability to do so is invaluable when you are looking at a vehicle to buy, or at examples of work presented to you by a shop who is vying for your project. In this article, I’ll give you some great ideas of things to look for when trying to size up a vehicle, either by looking at pictures, or even during an in-person inspection. This is written with our specialty, Toyota Land Cruisers, in mind, but the principles apply well to any make or model vehicle.
It’s worth mentioning right up front, that I tried to write this article without using pictures. Not that it’s not easy to find photos with examples of the red flags that I’m going to show you, but I’m not supposed to use any photo that’s not mine. After spending some time on one of the large auction sites, and on a couple of builders’ sites, I had some doozies! I couldn’t use them though, so I decided to use a few pictures from vehicles that I’ve visited personally. They aren’t the worst I’ve seen by far. When you get done reading this, just peruse the internet for yourself, and you will find plenty.
At least once a month, I get messages from people who have purchased a “restored” Land Cruiser, only to learn shortly after they took delivery of it, that it’s not what they expected. It happens a lot…way too much, in fact. There are lots of poorly restored, junky cars and trucks on the market. Some sellers/builders knowingly misrepresent the crap they are peddling, and some builders/sellers simply don’t know what they are doing or talking about and mistakenly misrepresent their cars. I wish I could do something about the source. Expose them for what they are! But that kind of thing might stir up too much trouble. What I can do is try to help educate buyers so that they can recognize problems with vehicles that show up in the pictures. It takes a little time to pay attention to the details, but usually, if the vehicle that is being evaluated is of poor quality, there will be red flags. Then, the right questions can help determine if the vehicle holds up to the value the seller put on it, or not.
My points in this article are directed towards relatively higher-priced vehicles for sale online and in auctions that have been restored or custom-built. I’m not talking about the 20-40K builds. Those vehicles probably have lots of problems, but the asking price reflects them. I’m writing this specifically referring to the higher-dollar cars. Those that are on the market for, let’s say, 80K and above…way above in some cases. The ones that should be better than they are. The ones that should be good.
To do this, I’ve decided to break the problems I see too often in vehicles for sale (and some shop’s restorations) down into: Body, Mechanical, and Fabrication. These are the same three labor groups we use to estimate and bill our labor. I’ll leave out the design part of the equation because even though I don’t agree with some people’s choices when it comes to things like configuration, color, and materials choices, those kinds of things can be subjective and might not actually impact value. Instead, I’ll just point out some of the most common and easily spotted mistakes in the three other areas. Some of them are dead giveaways of a giant shortcut that means trouble. Others are just small clues of problems that probably exist. Learn to spot them, and you will never get taken on a vehicle purchase.
Body Faux Pas
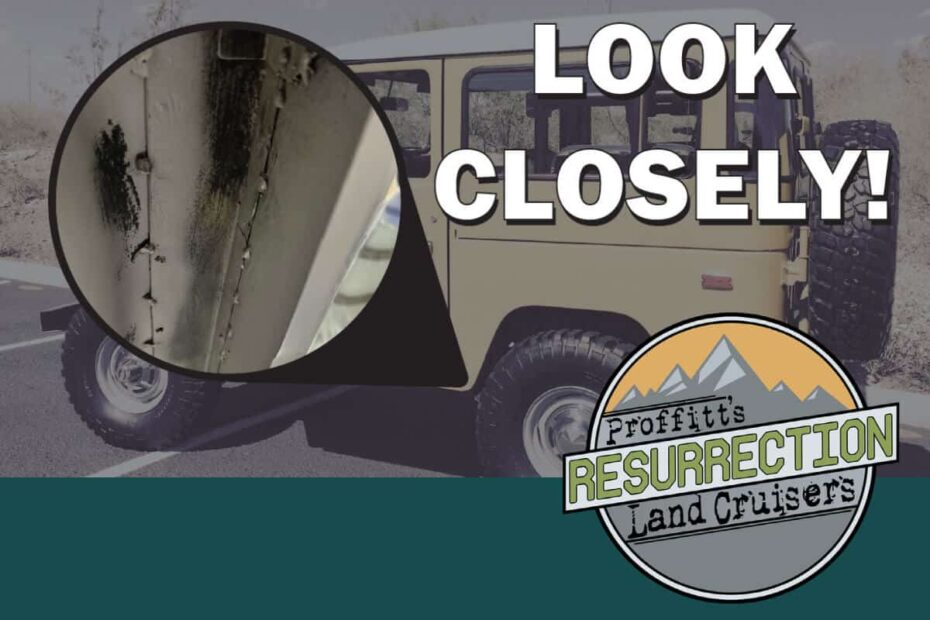
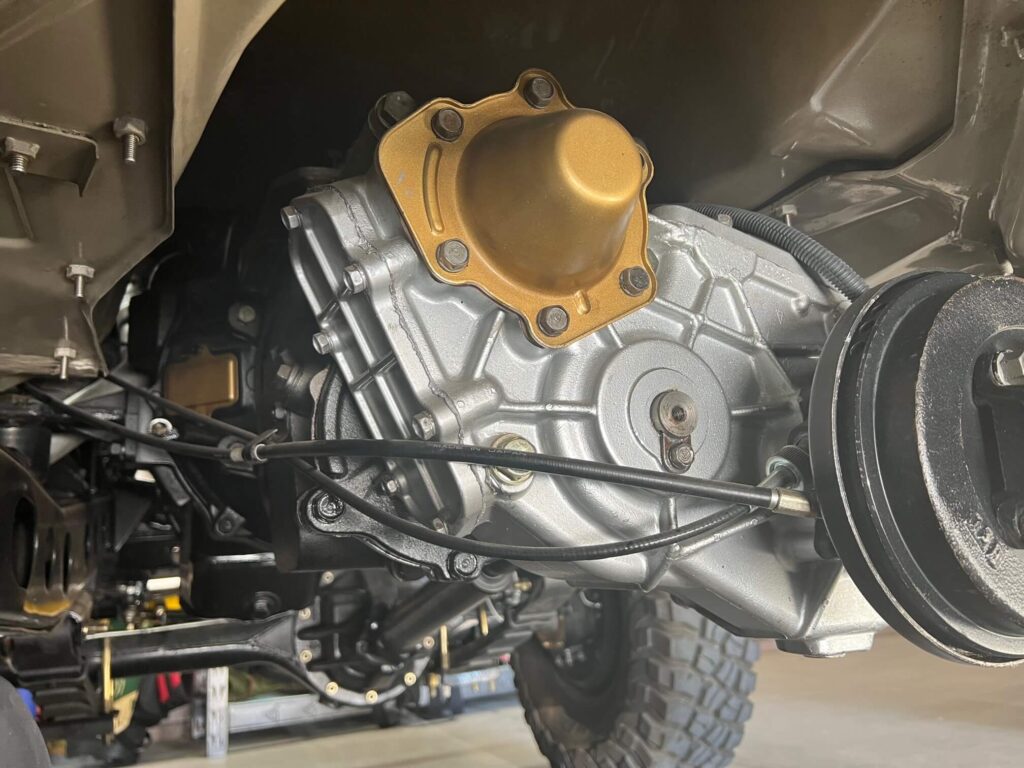
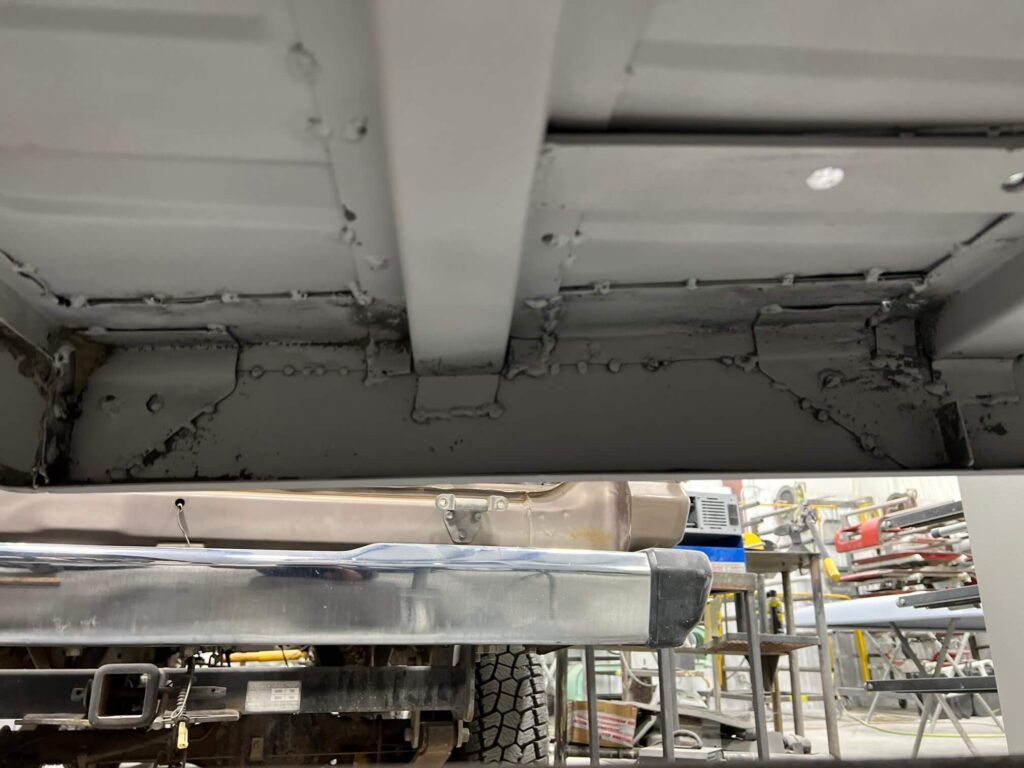
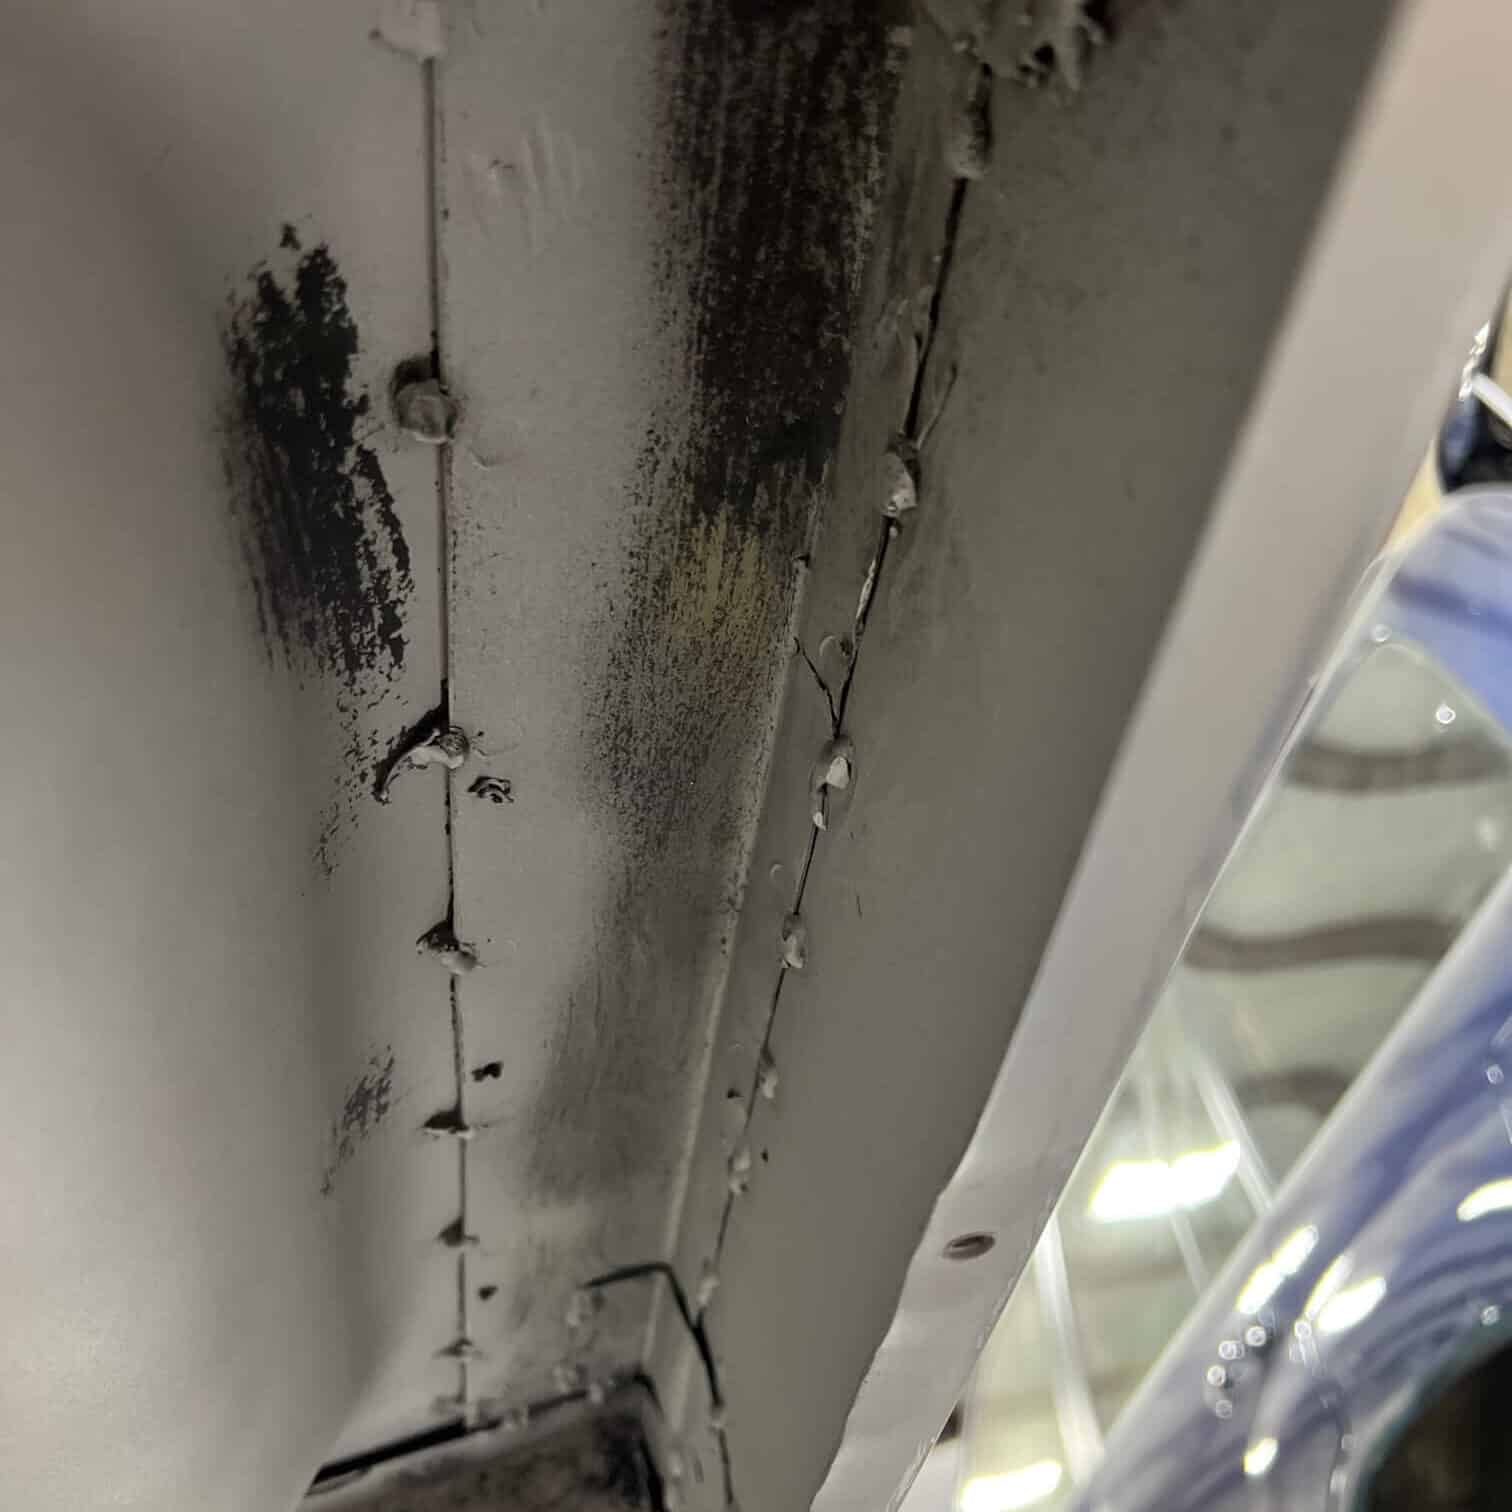
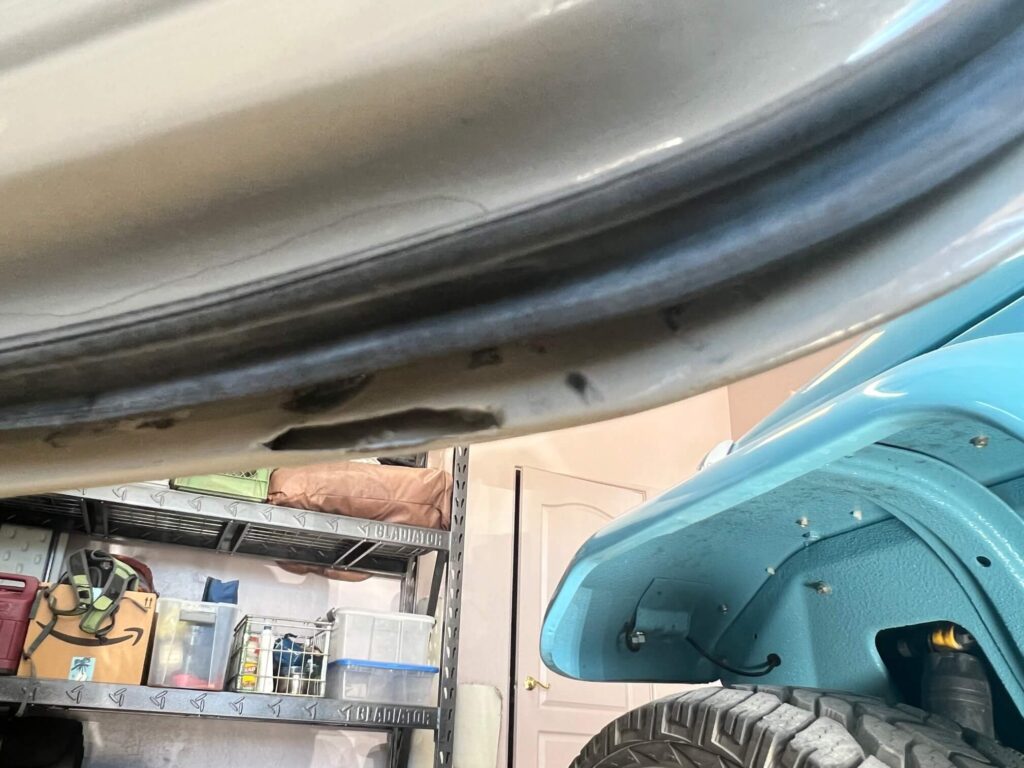
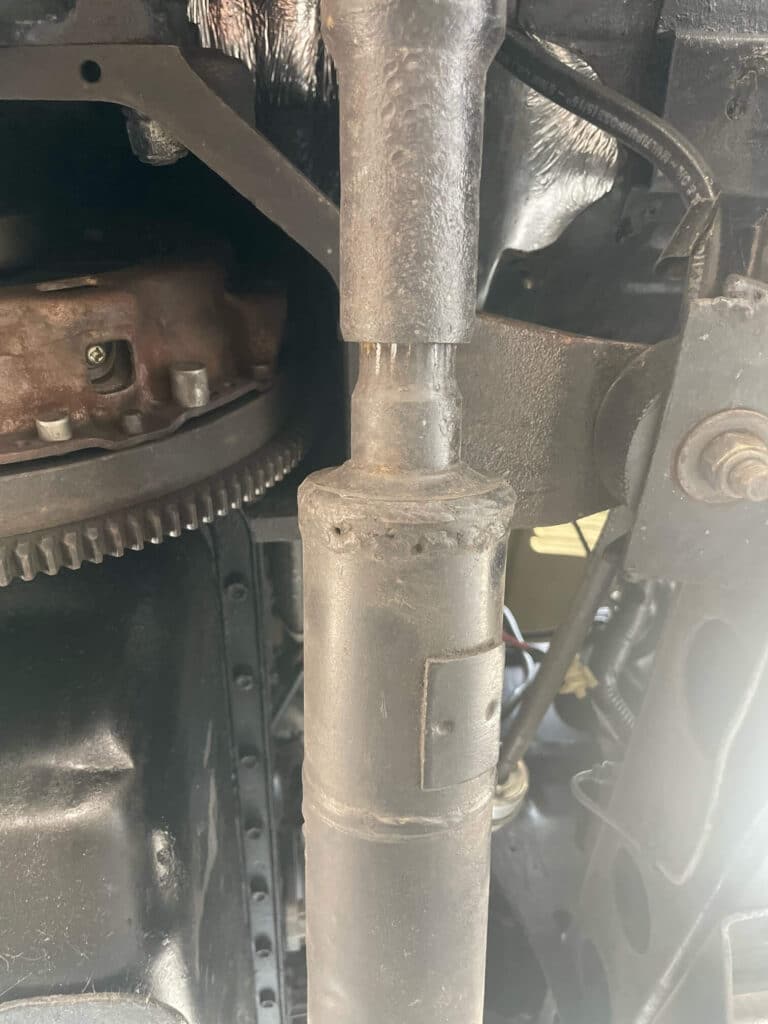
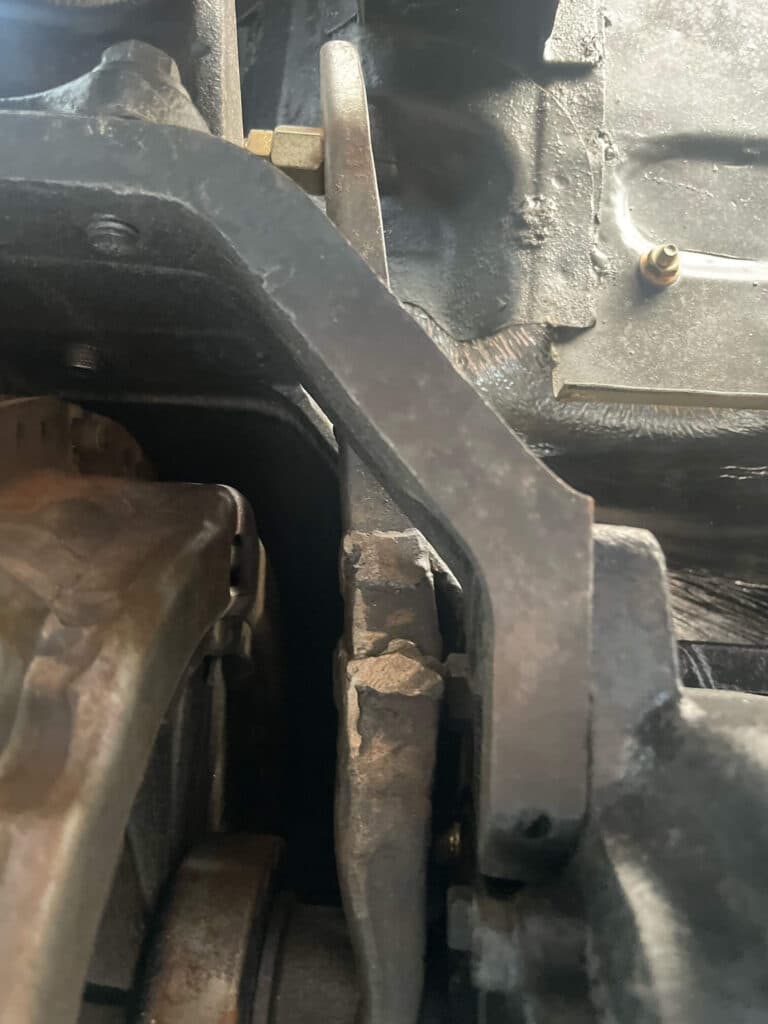
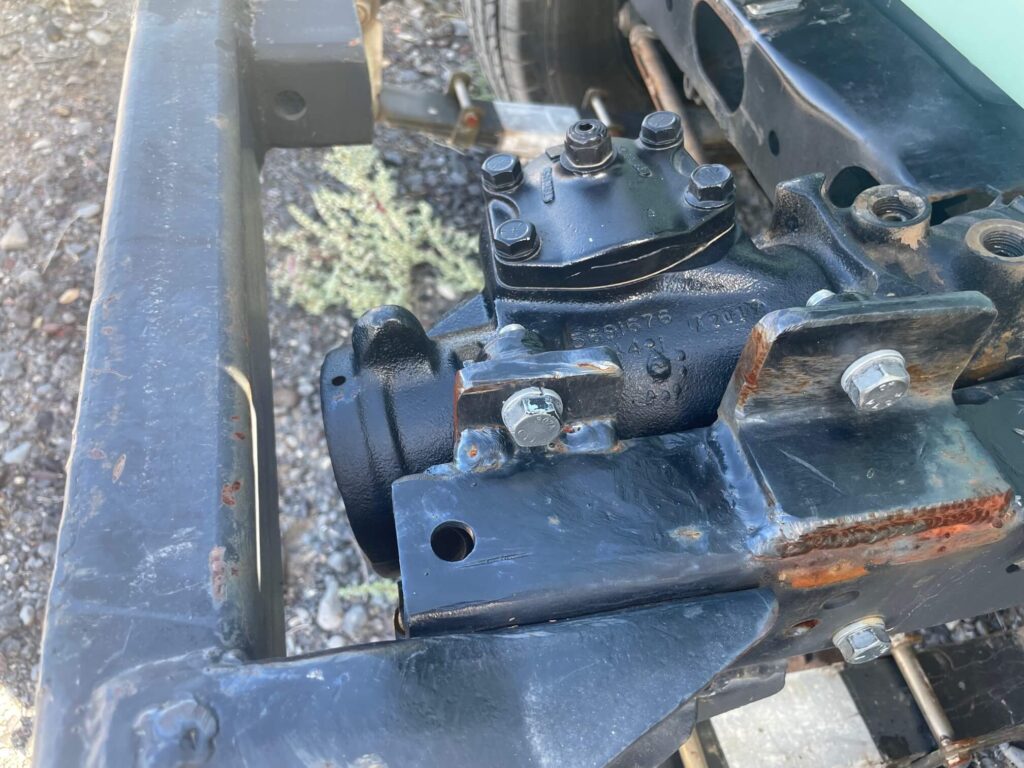
The term body is a little misleading. For me, this category really includes anything that is cosmetically refinished. Done properly, any vehicle in the price range I mentioned above is probably going to have been body-off restored (others call it a frame-off, but that doesn’t make any sense to me). That means more than just the body should be totally refinished. The frame, axles, suspension components, drivetrain components, undercarriage, and virtually every part of the vehicle should be cosmetically restored. These items, especially the hard to get to ones, should be closely inspected. If the restoration was done correctly, the entire vehicle should have been disassembled. Every part should have been separated and restored individually… and that means lots of contrast. When you look at the underside of a well-restored vehicle, there should be lots of different colors and textures. The underside of the body itself should have evidence of being stripped and repainted or recoated. Simply spraying paint or undercoating over the old surface is unacceptable. None of the fasteners, bolts, nuts, clamps, straps, etc., should be sprayed over. Those items should have been renewed or refinished separately with the appropriate coating. For fasteners, this means lots of gold or silver cad or zinc plating. If you see a black (painted or coated with whatever) bolt head…that’s a red flag. If most of them are black, it’s probably already time to run away. The same goes for the rest of the chassis and suspension. It should be very obvious that all of the parts received specific attention when they were off and separated. The frame should be a smooth and uniform black (usually), and the undercarriage of the body should be nicely painted or sprayed with a professional coating like a commercial two-part polyuria spray liner in a contrasting color (not black). The drivetrain and suspension components should all have their own special look, with attention to detail presented to each tiny part. All of the bolts and fasteners, clips, clamps, and springs should all be shiny and new looking. It’s common to see the undercarriage and chassis of a restored vehicle looking like a black monochromatic mess. That’s not a restoration, that’s a major shortcut. There is always rust and other nightmares covered up by that pathetic attempt at making the undercarriage look good.
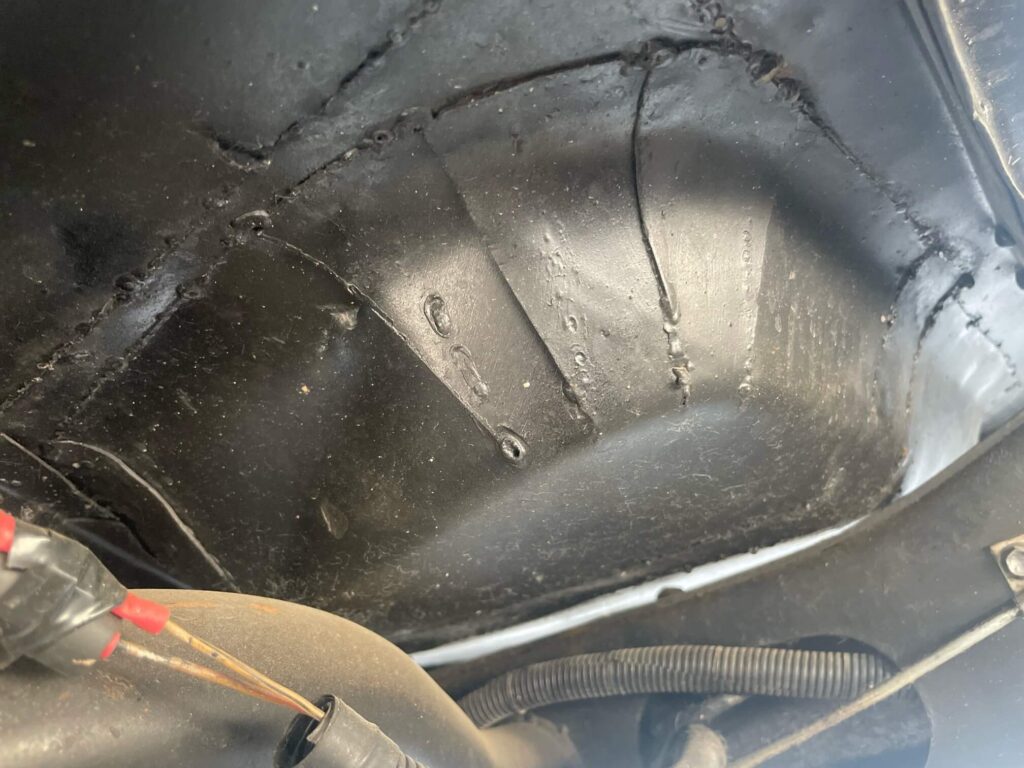
Another common mistake I see all the time is inferior metalwork. Luckily, bad metalwork is often quite easy to see. It will appear as out-of-place patches or lapped seams, typically on the bottom side of body components. It’s also common to see the evidence of welding, oftentimes substandard welding, on the underside of improperly done metal work. Good metalwork is the foundation of all quality body and paint work. If you have shoddy metalwork, it usually means all the work on top of it is garbage.
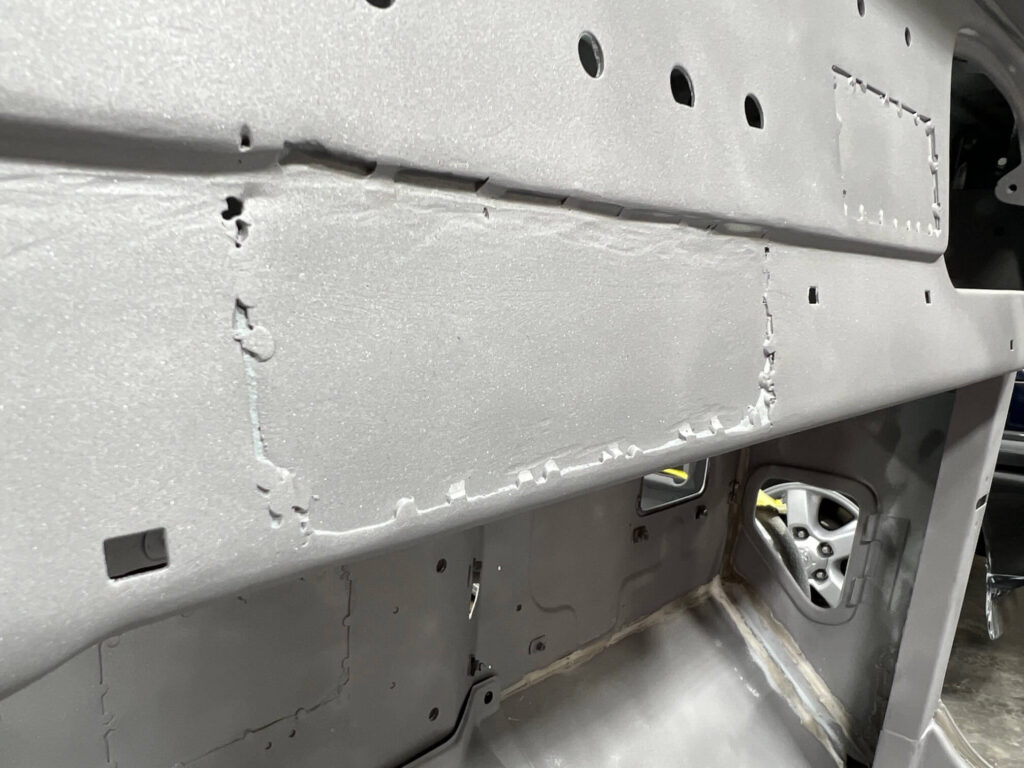
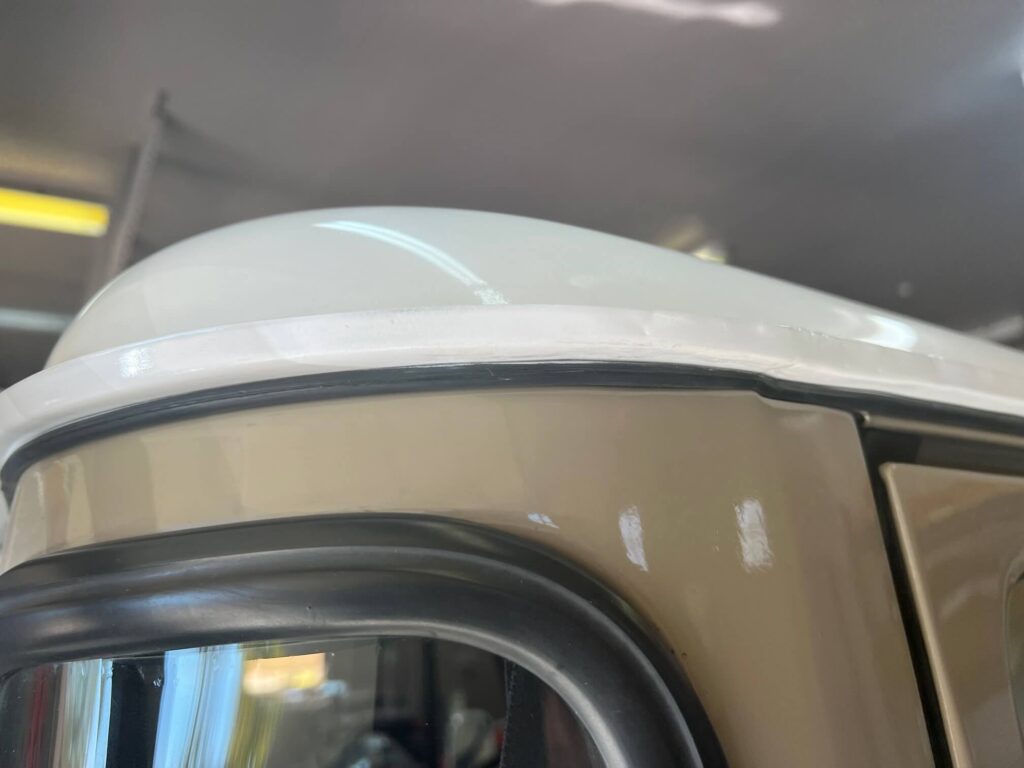
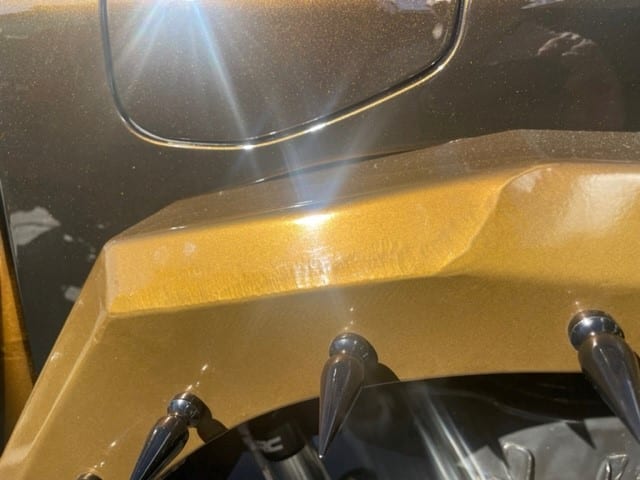
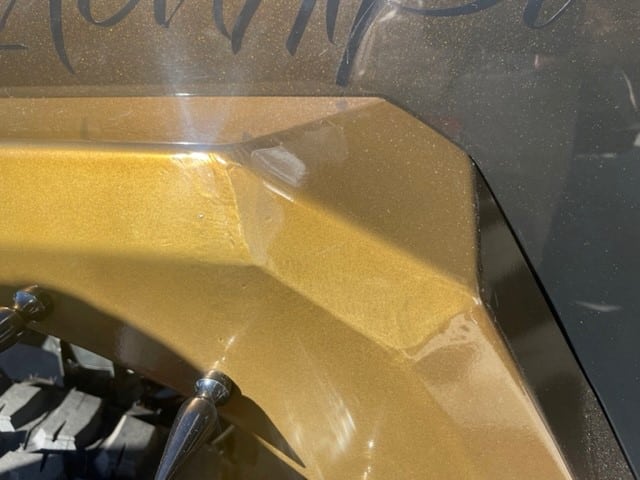
Up top, the body itself should have a nice paint job. Not necessarily 100% perfect, but high quality. There are a lot of variances here because some show car paint jobs take 5000 hours or more. You aren’t looking for perfection, but the difference between a 1000-hour paint hob and a 5000-hour paint job won’t show up in pictures anyway. In the pictures, you are looking for an even, consistent finish without excess orange peel or dry spray. Always look for evidence of unsatisfactory bodywork. This might appear as “wavy” or “poofy” looking panels or body lines that aren’t straight. Substandard bodywork shows up all the time on the underside areas that are hard to get to. You might actually see evidence of unshaped or unsanded body filler on the underside of wheel well openings and rockers. If there is evidence of this, it’s a major red flag. Another very common red flag is the presence of extra holes in the body, interior or exterior. By this, I mean ANY hole that has no specific purpose and was not intentionally placed there by the restorer or the manufacturer. It’s surprisingly difficult to keep track of these, but a good restoration will have properly addressed all of the extra holes made over the years by owners mounting accessories, etc. Just like the undercarriage, you want to see all of the signs that the body was properly disassembled before refinishing. Evidence of paint on ANYTHING other than the body parts is BAD BAD BAD. If there’s paint on the weatherstripping of a 100K vehicle, somebody should be flogged.
You should also look for other things that shouldn’t have paint on them: like door handles, most bolts, etc. Toyota did paint most of the FJ40 as a unit while it was bolted together, but that was done so that their cars could be more affordable to the masses. A properly restored FJ40 will have new or refinished, unpainted bolts holding the panels together. Some will argue with me here, saying some of the bolts, like the ones in the door hinges of an FJ40, should be painted during restoration because they were painted from the factory. I say that’s wrong. Removing, reinstalling, and adjusting the doors means these bolts need to be used a lot, and if they are painted, the paint just breaks off of them when you apply a wrench or socket. A final thing that’s important to mention here is that earlier, I said to look for signs of bodywork. Don’t get me wrong; every restoration has bodywork, lots of it. But, if done properly, there won’t be evidence of it.
More things to look for on the body are the use of poor-quality aftermarket parts. In the case of Toyota, most restoration parts are still available OEM from Toyota. The use of any aftermarket part where there was an OEM option means that either the builder didn’t know what they were doing, or that they made the decision to use the cheaper part intentionally, both subpar moves for a high-quality restoration. How can you tell by looking at the pictures? Aftermarket weatherstripping is thinner and cheaper looking, aftermarket lights fade quickly, and aftermarket latches are stainless steel, thin, and chintzy.
Lastly, and slightly difficult to pick out on the body side of restored vehicles, is something I like to call “tinkering”. These are choices that the builder made that stray from the OEM look or authenticity of a vehicle. This is where some will disagree with me and use the argument that the builder was just exercising his or her style with the build. This could be true, but I’m going around style with my thinking here. I’m going to try to explain it this way: when I was a kid, I would get a new car (usually a Volkswagen) and immediately try to put my mark on it. This might have included some fuzzy dice on the mirror, chrome bolts that look like spikes, or chrome naked lady mudflaps (I’ve never actually done any of those things, but you get the idea). I wasn’t doing these things because I was a high-quality builder. The little changes that I was making certainly didn’t add value. I was just tinkering. Builders who do this with supposedly high-value rigs aren’t adding value either. If a build is going to stray from the conventional way of restoring that model, then all of the changes need to be part of an obvious plan and vision for the finished product. Not just a smattering of “let’s be different” impulses like painting parts of the engine some strange color or the bezel black. A genuine high-level builder wouldn’t do this. Unfortunately, in some cases, “blacking out” parts of a vehicle (spray painting grilles and other chrome pieces) falls into this category.
Are There Mechanical Flaws?
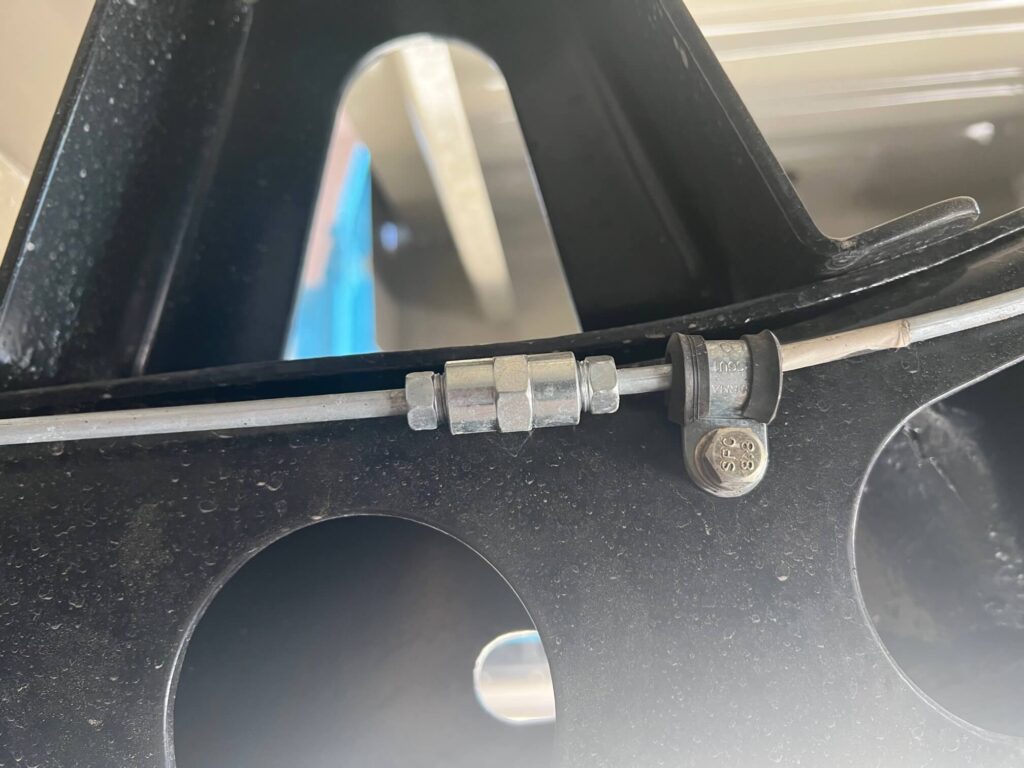
Obviously, not all mechanical flaws are going to be detectable in pictures. Things like a blown head gasket or bad brakes probably aren’t going to be visible. There are many things you can see in pictures that are a good indication of the quality of the mechanical work. If you see any of the visual signs of lousy mechanical installation that I identify here, then there are likely additional problems undetectable in photos. When I look at an underhood picture for the first time, I start looking for a few things right off the bat. A properly restored body-off or frame-off restoration is going to have a properly restored drivetrain to go with it. That means that every one of the mechanical components should either look new or be new. One of the most common poorly made or installed new mechanical items are brake lines. I’m talking about the brake lines that are running across or down the firewall from the brake and possibly clutch master cylinders. Original brake lines are usually not worth restoring, so the ones on the vehicle you are looking at are probably new. You can’t buy new pre-made brake lines for most vehicles, so the mechanic working on the rig probably built them. If they look shoddy…then well, that’s a clue that other mechanical work might be inferior too. Well-built brake lines look like this: They have very defined, deliberate bends in the correct places so that they follow the shape and contours of the firewall. The 90 and 180-degree bends have an even radius without tool marks. If two lines are running next to each other, they match perfectly. Lastly, the lines are clamped meticulously without the use of some hardware-store-looking plumbing clamp or zip tie. Brake lines are hard to do well, so they are a great place to start looking. Another immediately visible item in the engine compartment is the cooling system. For some reason that I don’t understand, it’s VERY common to take shortcuts on the cooling system. A stock-sized radiator in a vehicle with an engine conversion is a dead giveaway of mechanical ineptitude. Bigger engines always need more cooling. Other common signs of bad mechanical work that involve the cooling system are using those silly universal accordion-looking universal radiator hoses, and a mechanical fan without a fan shroud.
Another very visible mechanical item is the wiring on a vehicle. Like brake lines, wiring is also difficult to do well. It takes knowledge, skill, and patience. There are several things to look for when inspecting the vehicle’s wiring. It’s a good idea to ask for a picture of the under-dash wiring above the operator pedals. Look here, as well as in the engine compartment, for proper wire looming and routing. You should never see a bunch of wires that look like spaghetti running in every direction. Wires should be bundled together and secured with tape or loom and should be routed away from moving parts and heat sources. You should never see more than about 2” of any colored wire. It’s ok to see them as they go in and out of pigtails and plugs, but immediately after that, they should be routed into a loom. Wiring connections should always be solid, and probably hidden. The best wiring uses mostly soldered connections, which you shouldn’t see except for some heat shrink tubing in a couple of spots. For the most part, colored butt connectors are bad, especially the non-heat shrink kind. These are usually red, blue, or yellow. If you see a bunch of these connectors, It’s likely an indication that the wiring was done by an unskilled mechanic.
Lastly, on the mechanical side, I want to talk about bolts. The kind of bolts used on a build can be an obvious indicator of the build quality. A bolt is a detail, and someone who pays attention to detail will subsequently have paid attention to each fastener as they assembled the vehicle. There are some clear no-nos. With some exceptions, the use of SAE or non-metric fasteners of any kind on an import vehicle is a bad thing and a clear indicator that the builder didn’t know what they were doing. These are metric vehicles, so care should be taken to make sure the right fasteners are used. Then, even within the metric fastener world, there are better choices. Hardware store metric bolts are subpar, at best. These are bolts that have a flat head and usually some numbers on them. Nearly every fastener Toyota ever used had a dished head, so these are the types of fasteners that should thus be used in a “high-quality” restoration.
Fabrication Failures
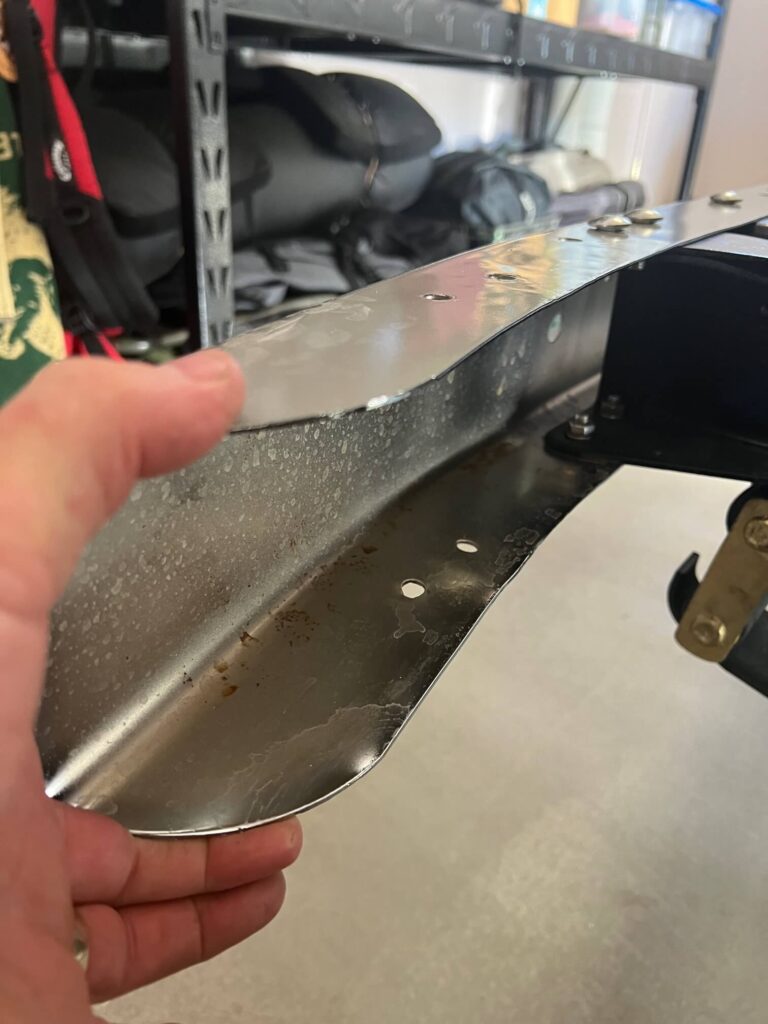
Now I want to talk about fabrication. Superior fabrication is the most difficult part of every vehicle build, so it’s easy to determine the quality of a build by looking at the fabricated parts. Lots of builders don’t pay fabrication enough attention, and the most cringe-worthy and dangerous parts of a bad build are almost always in this area. Learning how to spot these will really help you to quickly size up a vehicle that’s for sale. For starters, good fabricators NEVER use the two horrific types of steel known as angle iron or channel. These are for trailers and farm trucks and have no business being used on a nice restoration or custom build. Look for these commonly abused materials on bumpers or engine mounts, transmission crossmembers, etc. Then, to a lesser extent, square or rectangular tubing can be disagreeable as well. Skillful fabricators severely limit the use of these materials because they are an obvious shortcut. Use of these materials is rampant on lots of bumpers and transmission crossmembers. Why is it wrong to use rectangular tubing for a bumper channel? It gets the job done, right? Well, yes, but high-quality builds should do more than just get the job done. Fabrications should always leave the observer either wondering how it was done, or impressed with how it was done.
It’s also important to look at the details of the fabrication, in particular, the quality of the welds and the areas that are ground. Lots of welds shouldn’t be ground in the first place. It’s common to try to cover up a poor weld by grinding it smooth. For the most part, welds should have a very uniform pattern, even where they change angles or wrap around tubing. Where grinding is present and desirable, there should be no evidence of it. You should never see grinding scratches or pin holes on a finished product.
The design of fabricated components is also something that sticks out in lots of builds. Well-designed fabrications will flow with the vehicle and not stick out as being over the top or inconsistent with the rest of the vehicle. If it sticks out, it’s probably not good.
In a nutshell, and no offense here for the DIY enthusiast, fabrication can be looked at in this way. If it looks like something the average guy could do himself in his garage, It’s not good enough for a high-dollar restoration or custom-built vehicle.
To Wrap it Up
Now, As the time I set aside for this article is long expired, I find myself having to sum it up. I’m sure there are many red flags I forgot. For that reason, I’m going to put this work on our website in the FAQ section. That way, as more things come to mind, I can update the article over time. If any of my readers want to share their own horror story, suggest something to include, or even argue with me about something I did include, feel free to reply to this blog with your suggestions!
–Jeremiah
Ignorance hurts in the wallet. If more people showed what to look for, many people would not be taken advantage of. Great job. Keep it up. Poofy, very very poofy…
This gives me good things to think about as I restore my 1971 fj40 in my garage
What an enlightening article, most excellent information. Definitely exposes the amateurs. Thank you for sharing!!
Thanks Jeremiah for this outstanding primer on all that a good build should be, and how to avoid the bad and the ugly. As I read your thoughtful discussion, it strongly reinforced my confidence that PRLC is the right place — the only place — for my 1966 FJ40 project now under way.
Farm tractors and a lot of other things I have concluded to buy unrestored–the restos on tractors is usually terrible.
Look for the unrestored original to see an honest tractor or vehicle.
Illustrates and confirms why my fear of having a non-Landcruiser shop doing sheet metal repair and paint on my 40 is well founded. Even when they can do beautiful, flawless, and ethical work, (ie, you getting what you actually pay for). The FJ40 was never perfect from day one. I want to retain some of those imperfections, and some of it’s heritage. I want somebody that knows what needs to be correctly modified to help keep the tinworm away and the preserve the sheet metal for the amount of time I need it to and on a vehicle that does get used regularly. Both on and off road.
Thanks for the info, I’ll look at the link and see what it says! Thanks again
Great article! Do it right or don’t do it, even with a driver or fun project!
I think this article is great for the LC layman as well, like me. I’m not a mechanic or body guy and not even really that mechanically talented or inclined. But I do love cruisers and plan to eventually buy #2, #3, etc. etc. etc. We all have looks and styles that appeal to us and when I find one (at the same time that I also have the money) I want to NOT get taken. Thanks for pushing this into Q&A. It has the potential of becoming a really deep tutorial. Or, you could just take the gloves off and give us a series of over-the-shoulder videos with commentary while you are perusing the auction sites! ;-}
DT
Man what a great article!!! I learned a ton. Fortunately I am trying my best to do the highest quality restores on our SA FJ 40 down in Colombia. Every single part of the car taken apart refinished. As much OEM as possible. But l learned and agree with your article to much black on the underside. Nuts and bolts that were refinished but painted black. We will be correcting that. Most of the things from your article we are already doing correctly and your article gives me some confidence. Made a hedge ,”Tinkering” mistake also by using a rust activator and sealer under the hood which I thought looks cool but after this article that hood will be sanded and repainted beck to original asap!!! Thanks again for this article as I found it on BAT.
Comments are closed.